###1. uiautomator
在应用的开发过程中, 除了需要对组成android应用的组件(例如 activity, service, content provider)进行单元测试, 测试应用运行过程中的界面行为也很有必要, UI 测试确保应用在一系列的用户操作之后(比如键盘输入, 点击工具栏,菜单,对话框,以及其它的UI控件), 得到正确的UI输出
UI 测试的通用方式是手工运行测试, 验证应用是否如同期期望一般地运行, 但是这种方式非常耗时, 使用软件进行自动化测试是更好的方法, 自动化测试涉及创建程序执行测试任务来覆盖指定的用户场景, 然后使用测试框架自动重复地运行测试用例
Android 4.1 发布时包含了一种新的测试框架: uiautomator, 包括如下的工具
- uiautomatorviewer : 一个图形界面的工具, 可以通过adb连接来分析android设备上当前应用的UI
- uiautomator : 一个测试的java库, 包含了创建UI测试的各种API和执行自动化测试的引擎
要使用 uiautomator, 需要满足如下的条件:
- Android SDK tools, 版本不小于 21
- Android SDK platform, API 16 或者更高
###2. uiautomator 与 uiautomator 2.0
这2者的api相差不大, 主要的差别如下:
- uiautomator 2 基于 android Instrumentation, 因此其TestCase 不再需要继承UiAutomatorTestCase
- Uiautomator是java项目, 而Uiautomator2是安卓项目,可在 Android Studio上直接使用 3、Uiautomator的java工程需借助utf7输入法才能输入中文, 而 Uiautomator2可以输入中文
- Uiautomator直接指定父类也可以在子类中输入文字, Uiautomator2必须明确EditText框才能向里面输入文字
后续所有的说明均是针对 uiautomator 2
###3. uiautomatorviewer
在开始编写 uiautomator 测试代码之前, 需要先使用 uiautomatorviewer 辨别待测试的应用的UI控件元素
安装 Android Studio 后, 在 sdk/tools 目录中包含了 uiautomatorviewer工具, 运行后如下图
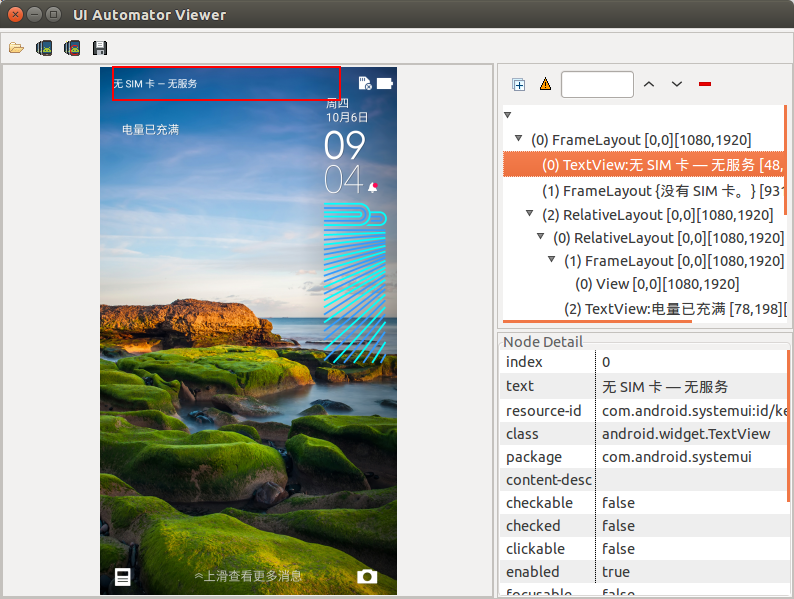
在 uiatomatorviewer 中, 在抓取的ui界面上移动鼠标, 当前的UI控件会以红色线框圈中, 并且右下角会显示该ui控件的相关信息, 而右上角则是显示了ui控件的层级关系
由于 uiautomator 工具依赖android设备的可访问性来获取UI控件, 所以这一点很重要, 要支持 uiautomator工具需要满足如下的条件:
- 在应用的 layout 文件中使用 “android:contentDescription” 属性给 ImageButton, ImageView, CheckBox 等控件设置标签
- 使用 “android:hint” 属性来标记 EditText 控件, 而不是里面的文本内容 (文本内容可以被修改)
- 对于用于提供操作视觉反馈的UI (文本或者图标), 都添加一个 “android:hint” 标记
- 确保所有用户课操作的UI元素都可以通过方向控制键选中(例如轨迹球)
- 通过 uiautomatorview 工具来确保所有的UI元素都可以被测试工具访问到
###4. uiautomator API
uiautomator API 在 uiautomator 文件中, 这些api如下
####4.1 UiDevice
UiDevice 代表设备的状态, 可以通过 UiDevice来检测设备的各种属性, 例如当前屏幕的方向, 屏幕的尺寸, 同时还可以通过UiDevcie来执行对设备的操作(例如设置横屏/竖屏, 按下home键等)
UiDevice 提供的api如下:
实例化
//获取 UiDevice 的实例
public static UiDevice getInstance(Instrumentation instrumentation)

//例如:
UiDevice mUiDevice = UiDevice.getInstance(InstrumentationRegistry.getInstrumentation());
在android的Instrument测试代码里面,可以使用如下的方式来获取 UiDevice 的实例
UiDevice 可以实现的操作如下:
模拟按键事件
//模拟短按菜单键, 失败则返回false
public boolean pressMenu()

//模拟短按返回键, 失败则返回false
public boolean pressBack()

//模拟短按home键, 失败则返回false
public boolean pressHome()

//模拟短按搜索键, 失败则返回false
public boolean pressSearch()

//模拟短按方向键的中键, 失败则返回false
public boolean pressDPadCenter()

//模拟短按方向键的下键, 失败则返回false
public boolean pressDPadDown()

//模拟短按方向键的上键, 失败则返回false
public boolean pressDPadUp()

//模拟短按方向键的左键, 失败则返回false
public boolean pressDPadLeft()

//模拟短按方向键的右键, 失败则返回false
public boolean pressDPadRight()

//模拟短按删除键, 失败则返回false
public boolean pressDelete()

//模拟短按enter键, 失败则返回false
public boolean pressEnter()

//模拟短按指定的键,失败则返回false
//keycode 参照 android.view.keyEvent 中的键值定义 "KEYCODE_*"
public boolean pressKeyCode(int keyCode)

//模拟短按指定的键以及meta键, 失败则返回false
//参数 metaState 中的对应的bit置1表示meta key被按下
//keycode 参照 android.view.keyEvent 中的键值定义 "KEYCODE_*"
//meta key参照 android.view.keyEvent 中的meta key定义 "META_*"
public boolean pressKeyCode(int keyCode, int metaState)

//模拟短按recent键, 失败则返回false
public boolean pressRecentApps() throws RemoteException
模拟触摸事件
//在指定的坐标上模拟点击, 失败则返回false
public boolean click(int x, int y)

//在指定起点坐标到指定的终点坐标模拟一次swipe动作
//step可以控制流畅度和速度, 每一个step大约耗时5ms
public boolean swipe(int startX, int startY, int endX, int endY, int steps)

//在指定起点坐标到指定的终点坐标模拟一次drag动作
//step可以控制流畅度和速度, 每一个step大约耗时5ms
public boolean drag(int startX, int startY, int endX, int endY, int steps)

//按照指定的坐标数组的次序模拟一次swipe动作 (所以可以是任意的轨迹, 不再限定是直线)
//segmentSteps可以控制每2个坐标之间的流畅度和速度, 每一个step大约耗时5ms
public boolean swipe(Point[] segments, int segmentSteps)
获取/设置运行时屏幕的状态
//获取显示屏的尺寸, 以dp为单位
public Point getDisplaySizeDp()

//获取当前显示方向上显示屏的宽度, 单位为pix, 失败则返回0
public int getDisplayWidth()

//获取当前显示方向上显示屏的高度, 单位为pix, 失败则返回0
public int getDisplayHeight()

//检查当前的屏幕显示方向是否时设备的自然方向(若旋转角度为0或者180度则说明是自然方向)
public boolean isNaturalOrientation()

//禁用sensor并锁定屏幕当前的旋转方向
public void freezeRotation() throws RemoteException

//启用sendor并解除锁定屏幕当前的旋转方向
public void unfreezeRotation() throws RemoteException

//模拟设备向左旋转, 然后锁定屏幕的旋转方向并禁用sensor
//可以使用 unfreezeRotation() 来解除这一状态
public void setOrientationLeft() throws RemoteException

//模拟设备向右旋转, 然后锁定屏幕的旋转方向并禁用sensor
//可以使用 unfreezeRotation() 来解除这一状态
public void setOrientationRight() throws RemoteException

//模拟设备旋转到其自然方向, 然后锁定屏幕的旋转方向并禁用sensor
//可以使用 unfreezeRotation() 来解除这一状态
public void setOrientationNatural() throws RemoteException

//若设备当前为screen off状态, 则模拟按下 power key
//然后delay 500ms, 等待设备完成wakeup
public void wakeUp() throws RemoteException

//若当前处于screen on 的状态,则模拟按下 power key
public void sleep() throws RemoteException

//检查设备是否处于screen on
public boolean isScreenOn() throws RemoteException
查找UI对象
UI界面上的没哟一个view元素在UiAutomator中使用 UiObject 来表示, 每一个 view 使用 UiSelector 或者 BySelector 来描述
//获取匹配 selector 参数的 UiObject (代表一个view)
public UiObject findObject(UiSelector selector);

//判断是否有匹配 selector 参数的 UiObject 存在
public boolean hasObject(BySelector selector)

//获取匹配 selector 参数的第一个 UiObject2 (代表一个view)
public UiObject2 findObject(BySelector selector)

//获取匹配 selector 参数的所有的 UiObject (代表一个view)
public List<UiObject2> findObjects(BySelector selector)
UiWatcher相关
关于 UiWatcher, 后续会有详细的说明
//注册UiWatcher, 当 uiautomator 框架不能匹配到 UiSelector 描述的 UiObject 后
//自动运行 UiWatcher
public void registerWatcher(String name, UiWatcher watcher)

//注销指定的 UiWatcher
public void removeWatcher(String name)

//触发所有注册的 UiWatcher 运行
public void runWatchers()

//重置所有被触发的 UiWatcher, UiWatcher 的 checkForCondition() 返回 true, 则认为被触发
public void resetWatcherTriggers()

//检查指定的 UiWatcher 是否被触发
public boolean hasWatcherTriggered(String watcherName)

//检查是否有任何 UiWatcher 被触发
public boolean hasAnyWatcherTriggered()

//将指定的 UiWatcher 设置为被触发的状态
private void setWatcherTriggered(String watcherName)
条件等待
//等待指定的 condition 成立, timeout 单位为ms
public <R> R wait(SearchCondition<R> condition, long timeout)

//执行指定的 action 并等待指定的 condition 成立, timeout 单位为ms
public <R> R performActionAndWait(Runnable action, EventCondition<R> condition, long timeout)

//等待当前的 app idle, timeout为10s
public void waitForIdle()

//等待当前的 app idle, timeout单位为ms
public void waitForIdle(long timeout)
截图和 layout hierarchy dump
//设置 enable/disable layout hierarchy compression, 若设置为enable,
//则 hierarchy 中将不包含不必要的 surrounding layout 节点
//uiautomatorviewer 工具上也可以选择是否compress, 可以比较结果的差异
public void setCompressedLayoutHeirarchy(boolean compressed)

//dump 当前 window 的 layout hierarchy
public void dumpWindowHierarchy(String fileName)
public void dumpWindowHierarchy(File dest) throws IOException
public void dumpWindowHierarchy(OutputStream out) throws IOException

//等待指定的pakcage 的 window 内容更新, 若不指定, 则前端的任意window更新后, 都会返回
//若指定的package name和当前的window的package name不相同, 则立即返回
//timeout 单位为ms, 只有window更新, 返回值才为true
public boolean waitForWindowUpdate(final String packageName, long timeout)

//截屏并保存为png文件, 失败则返回false
public boolean takeScreenshot(File storePath)

//截屏并保存为png文件, 可以指定缩小系数和png压缩质量
public boolean takeScreenshot(File storePath, float scale, int quality)
其它
//获取最后一次 Traversed event (处理layout和draw)中的 text, 若没有则返回空字符串
//可以利用此方法获取webview container里面的内容(即先高亮选中内容再调用此方法)
public String getLastTraversedText()

//清除最后一次 Traversed event (处理layout和draw)中的 text
public void clearLastTraversedText()

//执行shell指令
public String executeShellCommand(String cmd) throws IOException

//获取 launcher 的package name
public String getLauncherPackageName()

//获取当前的 package name
public String getCurrentPackageName()

//打开systemui 的 notifictation (即下拉出通知栏)
public boolean openNotification()

//打开systemui 的 quick setting (即下拉出quick setting)
public boolean openQuickSettings()

//获取设备的product name, 即 ro.product.name 的值
public String getProductName()
####4.2 UiSelecror
UiSelector 用于描述一个view, 以帮助从界面上搜索一个特定的UI元素
UiSelector 提供如下的接口以指定UI的描述信息
//根据文本来搜索UI元素
public UiSelector text(String text)
public UiSelector textMatches(String regex)
public UiSelector textStartsWith(String text)
public UiSelector textContains(String text)

//根据 className/class 来搜索UI元素, 例如 “android.widget.Button”
public UiSelector className(String className)
public UiSelector classNameMatches(String regex)
public <T> UiSelector className(Class<T> type)

//根据 package name 来搜索UI元素
public UiSelector packageName(String name)
public UiSelector packageNameMatches(String regex)

//根据 content description 属性来搜索UI元素
public UiSelector description(String desc)
public UiSelector descriptionMatches(String regex)
public UiSelector descriptionStartsWith(String desc)
public UiSelector descriptionContains(String desc)

//根据 resource-id 来搜索UI元素
public UiSelector resourceId(String id)
public UiSelector resourceIdMatches(String regex)

//根据同级中的索引来搜索UI元素 可参考 uiautomatorviewer 工具中列出的索引
//这不是一个可靠的方法, 应该使用 instance() 方法来代替
public UiSelector index(final int index)

//根据实例的次序来搜索UI元素
//例如要搜索第3张image, 可以使用
//`new UiSelector().className("android.widget.ImageView").instance(2);`
public UiSelector instance(final int instance)

//根据状态来搜索UI元素
public UiSelector enabled(boolean val)
public UiSelector focused(boolean val)
public UiSelector selected(boolean val)
public UiSelector checked(boolean val)

//根据属性来搜索UI元素
public UiSelector scrollable(boolean val)
public UiSelector focusable(boolean val)
public UiSelector checkable(boolean val)
public UiSelector clickable(boolean val)
public UiSelector longClickable(boolean val)

//根据子UI元素来搜索UI元素
public UiSelector childSelector(UiSelector selector)

//从父UI元素向下递归查找UI元素
public UiSelector fromParent(UiSelector selector)
具体控件的详细信息可以在 uiautomatorviewer 工具 的右边列出
这些搜索条件可以组合使用, 例如
new UiSelector().className("android.widget.EditText").text("姓名"));
new UiSelector().resourceId("com.android.systemui:id/activity_description").description("联系人");
####4.3 BySelector
BySelector类为指定搜索条件进行匹配UI元素
BySelector 类不能直接实例化, 必须借助其 Class By 的静态工厂方法来构造 BySelector, 比如应当使用 findObject(By.text("foo")) ,而不是findObject(new Selector().text("foo"))这样的形式
相关 API 如下:
//根据 className / class 来搜索UI元素
public BySelector clazz(String className)
public BySelector clazz(String packageName, String className)
public BySelector clazz(Class clazz)
public BySelector clazz(Pattern className)

//根据 package Name 来搜索UI元素
public BySelector pkg(String applicationPackage)
public BySelector pkg(Pattern applicationPackage)

//根据 content description 来搜索UI元素
public BySelector desc(String contentDescription)
public BySelector descContains(String substring)
public BySelector descStartsWith(String substring)
public BySelector descEndsWith(String substring)
public BySelector desc(Pattern contentDescription)

//根据 resource-name / resource-id 来搜索UI元素
public BySelector res(String resourceName)
public BySelector res(String resourcePackage, String resourceId)
public BySelector res(Pattern resourceName)

//根据文本来搜索UI元素
public BySelector text(String textValue)
public BySelector textContains(String substring)
public BySelector textStBySelector UiSelectorartsWith(String substring)
public BySelector textEndsWith(String substring)
public BySelector text(Pattern textValue)

//根据属性来搜索UI元素
public BySelector checkable(boolean isCheckable)
public BySelector clickable(boolean isClickable)
public BySelector focusable(boolean isFocusable)
public BySelector longClickable(boolean isLongClickable)
public BySelector scrollable(boolean isScrollable)

//根据状态来搜索UI元素
public BySelector checked(boolean isChecked)
public BySelector enabled(boolean isEnabled)
public BySelector focused(boolean isFocused)
public BySelector selected(boolean isSelected)

//根据层级来搜索UI元素, 可参见 uiautomatorviewer 工具右上方列出的 UI 层级关系
public BySelector depth(int exactDepth)
public BySelector depth(int min, int max)
public BySelector minDepth(int min)
public BySelector maxDepth(int max)

//根据 子UI元素/子孙UI元素 来搜索UI元素
public BySelector hasChild(BySelector childSelector)
public BySelector hasDescendant(BySelector descendantSelector)
public BySelector hasDescendant(BySelector descendantSelector, int maxDepth)
和 UiSelector 一样, BySelecor 也可以指定多种搜索条件进行组合
####4.4 UiObject
UiObject代表一个UI元素, 获取 UiObject 对象需要使用 UiDevice 的 findObject() 接口以及一个描述UI 的 UiSelector 实例
通过 UiObject 对象可以获取对应的 view 的信息, 以及对对应的view进行操作
//获取UI元素的子UI元素
public UiObject getChild(UiSelector selector)

//获取UI元素的父UI的子UI元素(即其兄弟UI元素)
public UiObject getFromParent(UiSelector selector)

//获取UI元素的子UI元素的数目
public int getChildCount() throws UiObjectNotFoundException

//将UI元素drag 到另一UI元素上
public boolean dragTo(UiObject destObj, int steps) throws UiObjectNotFoundException
public boolean dragTo(int destX, int destY, int steps) throws UiObjectNotFoundException

//在UI元素上执行swipe操作
public boolean swipeUp(int steps) throws UiObjectNotFoundException
public boolean swipeDown(int steps) throws UiObjectNotFoundException
public boolean swipeLeft(int steps) throws UiObjectNotFoundException
public boolean swipeRight(int steps) throws UiObjectNotFoundException

//在UI元素上执行点击操作
public boolean click() throws UiObjectNotFoundException
public boolean clickTopLeft() throws UiObjectNotFoundException
public boolean clickBottomRight()
public boolean longClick() throws UiObjectNotFoundException
public boolean longClickTopLeft()
public boolean longClickBottomRight() throws UiObjectNotFoundException

//在UI元素上执行点击操作并等待 window 更新
public boolean clickAndWaitForNewWindow() throws UiObjectNotFoundException

//在UI元素上执行点击操作并等待建立新的window, timeout 单位为ms
public boolean clickAndWaitForNewWindow(long timeout) throws UiObjectNotFoundException

//获取UI元素上的文本
public String getText() throws UiObjectNotFoundException

//获取UI元素的的className
public String getClassName() throws UiObjectNotFoundException

//获取UI元素的description
public String getContentDescription() throws UiObjectNotFoundException

//设置UI元素的文本
public boolean setText(String text) throws UiObjectNotFoundException

//清除UI元素的文本
public void clearTextField() throws UiObjectNotFoundException

//获取UI元素的状态
public boolean isChecked() throws UiObjectNotFoundException
public boolean isSelected() throws UiObjectNotFoundException
public boolean isEnabled() throws UiObjectNotFoundException
public boolean isFocused() throws UiObjectNotFoundException

//获取UI元素的属性
public boolean isCheckable() throws UiObjectNotFoundException
public boolean isClickable() throws UiObjectNotFoundException
public boolean isFocusable() throws UiObjectNotFoundException
public boolean isScrollable() throws UiObjectNotFoundException
public boolean isLongClickable() throws UiObjectNotFoundException

//获取UI元素的packagename
public String getPackageName() throws UiObjectNotFoundException

//获取UI元素的 可视区域/区域
public Rect getVisibleBounds() throws UiObjectNotFoundException
public Rect getBounds() throws UiObjectNotFoundException

//等待UI元素 可见 / 不可见
public boolean waitForExists(long timeout)
public boolean waitUntilGone(long timeout)

//检查UI元素是否可见
public boolean exists()

//在UI元素上执行2点触控, 两指远离 / 两指靠近
public boolean pinchOut(int percent, int steps) throws UiObjectNotFoundException、
public boolean pinchIn(int percent, int steps) throws UiObjectNotFoundException

//在UI元素上执行2点触控
public boolean performTwoPointerGesture(Point startPoint1, Point startPoint2, Point endPoint1,
        Point endPoint2, int steps)

//在UI元素上执行多点触控
public boolean performMultiPointerGesture(PointerCoords[] ...touches)
查找到的 UiObject 实例在代码中可以重用, 需要注意的是, 每次使用 UiObject 做操作的时候, uiautomator 框架都会在当前屏幕重新查找该控件
UiObject2 代表一个UI元素, 它和 UiObject 相似, api 也相差无几, 和UiObject不同,UiObject2是绑定到一个特定的视图实例,如果它的底层视图对象被摧毁,它可能会过时。因此,如果UI变化显著它可能需要调用findObject(BySelector)获得一个新的UiObject2实例
####4.5 UiCollection
UiCollection 继承自 UiObject, 是 UiObject 对象的集合, 因为根据 UiSelector 描述的条件, 搜索的到的, 可能是多个满足条件的 UI元素的集合, 因此可以用来生成 UiCollection
UiCollection 的 api:
//实例化 UiCollection
public UiCollection(UiSelector selector);

//根据 UiSelector 和 content descriptor 从 UiCollector 中搜索UI元素
public UiObject getChildByDescription(UiSelector childPattern, String text)

//根据 UiSelector 和 instance index 从 UiCollector 中搜索UI元素
public UiObject getChildByInstance(UiSelector childPattern, int instance)

//根据 UiSelector 和 text 从 UiCollector 中搜索UI元素
public UiObject getChildByText(UiSelector childPattern, String text)

//获取符合 UiSelector 搜索条件的 子UI元素的数目 (只有在屏幕范围内可见的符合条件的UI元素才会被计数)
public int getChildCount(UiSelector childPattern)
####4.6 UiScrollable
UiScrollable 继承自 UiCollection, 用于表示可以滚动的UI元素,如果需要操作的UI元素在屏幕外,要滚动屏幕才能看到时, 需要使用UiScrollable
UiScrollable 的滚动方向定义如下:
- forward : 与从上向下滑动的手势的效果相同(垂直方向); 与从左向右滑动的手势的效果相同(水平方向)
- backward : 与从下向上滑动的手势的效果相同(垂直方向); 与从右向左滑动的手势的效果相同(水平方向)
UiScrollable 在滚动操作时, 可以设置每一次滚动的step值, 用于控制滚动的速度, 每一个step耗时5ms, 根据速度不同, UiScrollable的滚动操作可以分为2类:
- scroll : 默认step为55, 即耗时275ms
- fling : 默认step为5, 即耗时25ms
另外, UiScrollable 还有一个 非接触区(no-touch zone)的概念, 非接触区是指设置 scrollable 的 width 和 height的一个百分比, 为其中可滚动部分指定一个margin值, UiScrollable 的滚动操作必须在margin值以内的区域内进行, 这是因为如果在太靠近边界的位置进行滚动操作的话, 可能会没有响应, 非接触区(no-touch zone)默认值为10%
UiScrollable 的 api 如下
//实例化 UiScrollable
public UiScrollable(UiSelector container)

//设置滚动方向为 垂直 / 水平
public UiScrollable setAsVerticalList()
public UiScrollable setAsHorizontalList()

//根据指定的搜索条件, 从 UiScrollable 中搜索UI元素 (默认进行滚动搜索)
public UiObject getChildByDescription(UiSelector childPattern, String text)
        throws UiObjectNotFoundException
public UiObject getChildByText(UiSelector childPattern, String text)
        throws UiObjectNotFoundException

//根据指定的搜索条件, 从 UiScrollable 中搜索UI元素, 可设置是否进行滚动搜索
public UiObject getChildByDescription(UiSelector childPattern, String text,
        boolean allowScrollSearch) throws UiObjectNotFoundException
public UiObject getChildByText(UiSelector childPattern, String text, boolean allowScrollSearch)
        throws UiObjectNotFoundException

//根据 UiSelector 和 instance index 从 UiScrollable 中搜索UI元素, 不进行滚动搜索, 只在显示范围内进行搜索
public UiObject getChildByInstance(UiSelector childPattern, int instance)

//向前滚动, 直到符合搜索条件的UI元素显示出来
public boolean scrollDescriptionIntoView(String text) throws UiObjectNotFoundException
public boolean scrollIntoView(UiObject obj) throws UiObjectNotFoundException
public boolean scrollIntoView(UiSelector selector) throws UiObjectNotFoundException
public boolean scrollTextIntoView(String text) throws UiObjectNotFoundException

//向前滚动, 直到指定的UI元素完全显示出来
public boolean ensureFullyVisible(UiObject childObject) throws UiObjectNotFoundException

//指定在滚动查找指定的子UI元素时, 最大的滚动次数
public UiScrollable setMaxSearchSwipes(int swipes)

//在滚动查找指定的子UI元素时, 最大的滚动次数
public int getMaxSearchSwipes()

//向前 / 向后滚动一次, 默认step是55, 每一step耗时5ms
public boolean scrollForward() throws UiObjectNotFoundException
public boolean scrollForward(int steps) throws UiObjectNotFoundException
public boolean scrollBackward() throws UiObjectNotFoundException
public boolean scrollBackward(int steps) throws UiObjectNotFoundException

//向前 / 向后飞滚一次, 默认step是5, 每一step耗时5ms
public boolean flingForward() throws UiObjectNotFoundException
public boolean flingBackward() throws UiObjectNotFoundException

//向 起始位置 / 结束位置 滚动指定的次数, 默认step是55, 每一step耗时5ms
public boolean scrollToBeginning(int maxSwipes, int steps) throws UiObjectNotFoundException
public boolean scrollToBeginning(int maxSwipes) throws UiObjectNotFoundException
public boolean scrollToEnd(int maxSwipes, int steps) throws UiObjectNotFoundExceptio
public boolean scrollToEnd(int maxSwipes) throws UiObjectNotFoundException

//向 起始位置 / 结束位置 滚动指定的次数, 默认step是5, 每一step耗时5ms
public boolean flingToBeginning(int maxSwipes) throws UiObjectNotFoundException
public boolean flingToEnd(int maxSwipes) throws UiObjectNotFoundException

//设置 / 获取 非接触区(no-touch zone) 的值, 范围为 0 ~ 1
public double getSwipeDeadZonePercentage()
public UiScrollable setSwipeDeadZonePercentage(double swipeDeadZonePercentage)
####4.7 Until
在利用 uiautomator 进行UI测试时, 通常需要等到某个条件成立, 才能继续进行后续的测试,uiautomator 中实现了 3 个 condition类, 用于描述不同的条件:
- UiObject2Condition : 代表UiObject2对象满足某个特定的状态
- SearchCondition : 代表满足一定条件的,需要查找的UI元素,主要用于判断是否存在某个UI元素
- EventCondition : 是一种条件,它依赖于一个事件或一系列事件发生,主要用于判断某个事件是否发生了
这些类都不能直接实例化, 需要使用 Util 这一工具类提供静态方法生成各种条件的对象 :
UiObject2Condition
//UiObject2对象的属性满足指定的条件
public static UiObject2Condition<Boolean> checkable(final boolean isCheckable)
public static UiObject2Condition<Boolean> clickable(final boolean isClickable)
public static UiObject2Condition<Boolean> focusable(final boolean isFocusable)
public static UiObject2Condition<Boolean> longClickable(final boolean isLongClickable)
public static UiObject2Condition<Boolean> scrollable(final boolean isScrollable)

//UiObject2对象的状态满足指定的条件
public static UiObject2Condition<Boolean> checked(final boolean isChecked)
public static UiObject2Condition<Boolean> enabled(final boolean isEnabled)
public static UiObject2Condition<Boolean> focused(final boolean isFocused)
public static UiObject2Condition<Boolean> selected(final boolean isSelected)

//UiObject2对象的contecnt descriptor满足指定的条件
public static UiObject2Condition<Boolean> descMatches(final Pattern regex)
public static UiObject2Condition<Boolean> descMatches(String regex)
public static UiObject2Condition<Boolean> descEquals(String contentDescription)
public static UiObject2Condition<Boolean> descContains(String substring)
public static UiObject2Condition<Boolean> descStartsWith(String substring)
public static UiObject2Condition<Boolean> descEndsWith(String substring)

//UiObject2对象的文本满足指定的条件
public static UiObject2Condition<Boolean> textMatches(final Pattern regex)
public static UiObject2Condition<Boolean> textMatches(String regex)
public static UiObject2Condition<Boolean> textEquals(String text)
public static UiObject2Condition<Boolean> textContains(String substring)
public static UiObject2Condition<Boolean> textStartsWith(String substring)
public static UiObject2Condition<Boolean> textEndsWith(String substring)
例如:
UiObject2 ui = mDevice.findObject(By.res("com.android.setting:id/switch_widget"));
if (ui.isChecked()){
    ui.click();
}
Assert.assertTrue(ui.wait(Until.checked(false),1000));
SearchCondition
//UI元素不可见
public static SearchCondition<Boolean> gone(final BySelector selector)

//至少存在一个满足描述的UI元素
public static SearchCondition<Boolean> hasObject(final BySelector selector)

//至少存在一个满足描述的UI元素, 返回第一个满足描述的UiObject2对象
public static SearchCondition<UiObject2> findObject(final BySelector selector)

//至少存在一个满足描述的UI元素, 返回所有满足描述的UiObject2对象
public static SearchCondition<List<UiObject2>> findObjects(final BySelector selector)
例如:
Assert.assertTrue(mDevice.wait(Until.gone(By.text("开启")),2000));
EventCondition
//新窗口出现
public static EventCondition<Boolean> newWindow()

//scroll 结束
public static EventCondition<Boolean> scrollFinished(final Direction direction)
例如:
final UiObject2 scrollList = mDevice.findObject(By.clazz("android.widget.ScrollView"));
Boolean result = mDevice.performActionAndWait(new Runnable() {
    @Override
    public void run() {
        for (int i = 0; i < 10; i++) {
            scrollList.scroll(Direction.DOWN, 0.5f);
        }
    }
}, Until.scrollFinished(Direction.DOWN), 10000);
####4.8 UiWatcher
当 uiautomator 框架通过 UiSelector 函数无法获取到UI控件的时候,就会回调在 UiDevice 上注册的 UiWatcher 的 checkForCondition函数
UiWatcher 的定义如下:
public interface UiWatcher {
    //返回true则标识该UiWatcher已经被triggered
    public boolean checkForCondition();
}
当 uiautomator 在匹配 UiSelector 的过程中, 无法搜索到合适的对象时, 会重试指定的时间, 等待显示的画面更新, 目标widget出现, 在这一过程中, 会回调注册了的 Uiwatcher 的 checkForCondition() 接口
UiWatcher 常见的应用场景是检查测试被打断,例如:
- 当正在测试被测应用的时候,有个电话拨入,这个时候被测应用被暂停,电话接听界面起来,再通过UiSelector就无法获取到你测试的应用上的UI元素了, 当超过一定时间还是没法获取到UI元素的时候,uiautomator会认为测试失败
- 要避免这种情况,可以在测试开始的时候 注册一个UiWatcher, 当电话接听界面起来后,uiautomator获取不到被测应用的界面了,就会回调UiWatcher的checkForCondition函数, 在该函数中可以判断当前界面是否为接电话界面,如果是说明测试过程被进入电话打断了,则可以点击挂机按钮挂断电话, 然后再回来继续测试
- 在 checkForCondition() 返回时, 可以根据需要返回true或者false, 以便是否将该UiWatcher置于triggered的状态 (已triggered的UiWatcher不会再次被触发)
同样 还可以注册一系列UiWatcher分别处理不同打断情况, 比如 闹钟响起的打断情况
####4.9 UiConfigrator
UiConfigrator 用于配置测试时的相关参数
//Uiautomator 在所有操作前几乎都会waitForIdle(), 等待用户界面进入idle状态
//因此, 若界面持续变化,则一定会等到超时值之后才会继续后续的步骤, 默认的值为10000ms
public Configurator setWaitForIdleTimeout(long timeout)
public long getWaitForIdleTimeout()

//设置 / 获取 搜索UI元素时的超时值, 默认值为 10000ms
public Configurator setWaitForSelectorTimeout(long timeout)
public long getWaitForSelectorTimeout()

//设置 / 获取 滚动操作的延时值, 用于uiautomator等待AccessibilityEvent
//以确认滚动操作是否成功, 默认值为200ms
public Configurator setScrollAcknowledgmentTimeout(long timeout)
public long getScrollAcknowledgmentTimeout()

//设置 / 获取 UI操作(例如click, press)的延时值, 用于uiautomator等待AccessibilityEvent
//以确认UI操作是否成功, 默认值为3000ms
//例如可以设置延时值为0以实现双击功能
public Configurator setActionAcknowledgmentTimeout(long timeout)
public long getActionAcknowledgmentTimeout()

//设置 / 获取 输入操作时, 2次键盘插入之间的延时值, 默认为0ms
public Configurator setKeyInjectionDelay(long delay)
public long getKeyInjectionDelay()
###5. 在 AndroidStudio 中使用 uiautomator
####5.1 新建android project
首先, 在 Android Studio中新建一个 android project, MinSDK选择 21 或者以上
在选择 Activity 时, 选择 “Add No Activity” 即可
####5.2 添加依赖
首先, 确保你的 Android Studio 已经安装了 Android Support Repository, 如果没有安装,在额可以去 SDK manager 中安装
然后修改 Module:app 的 build.gradle 文件, 在 dependencies section 中添加如下的内容:
dependencies {
    compile fileTree(dir: 'libs', include: ['*.jar'])
    testCompile 'junit:junit:4.12'
    compile 'com.android.support:appcompat-v7:23.1.1'

    //注解库, 它包含很多有用的元注解(例如 @NonNull,@Nullable等),你能用它们修饰你的代码,帮助你发现bug
  + androidTestCompile 'com.android.support:support-annotations:23.1.1'
    //android 的测试支持包
  + androidTestCompile 'com.android.support.test:runner:0.2'
  + androidTestCompile 'com.android.support.test:rules:0.2'
    //uiautomator框架
  + androidTestCompile 'com.android.support.test.uiautomator:uiautomator-v18:2.1.1'
}
并且在 android section 中的 defaultconfig section 中添加入如下的内容:
defaultConfig {
    applicationId "com.asus.sven.myapplication"
    minSdkVersion 21
    targetSdkVersion 23
    versionCode 1
    versionName "1.0"

    //指定使用 AndroidJUnitRunner 进行单元测试
  + testInstrumentationRunner "android.support.test.runner.AndroidJUnitRunner"
}
需要说明的是 AndroidJUnitRunner, 它是一个JUnit的测试runner, 支持JUnit3和JUnit4(包括 Espresso 和 UI Automator框架), 已经替代了InstrumentationTestRunner类(它只是支持JUnit3 的测试), 这也是google推荐的方式, 虽然 AndroidJUnitRunner 支持JUnit 3 和JUnit 4的测试,可是不允许混合他们在同一个包中(否则将会出现问题),如果想使用JUnit 4 来进行测试,我们将会使用前缀声明才可以: “@RunWith(AndroidJUnit4.class)”
####5.3 添加测试代码
在 android stuido 的工程的源码目录(androidTest部分)添加测试代码, 示例如下:
package com.example.test;

import android.content.Intent;
import android.support.test.InstrumentationRegistry;
import android.support.test.filters.SdkSuppress;
import android.support.test.runner.AndroidJUnit4;
import android.support.test.uiautomator.By;
import android.support.test.uiautomator.UiDevice;
import android.support.test.uiautomator.UiObject2;
import android.support.test.uiautomator.Until;
import android.test.suitebuilder.annotation.SmallTest;

import org.junit.Before;
import org.junit.Test;
import org.junit.runner.RunWith;

import static org.hamcrest.core.IsNull.notNullValue;
import static org.junit.Assert.assertEquals;
import static org.junit.Assert.assertThat;

@RunWith(AndroidJUnit4.class)
@SmallTest
public class CalculatorTest {
    private UiDevice mDevice;
    private static final int LAUNCH_TIMEOUT = 5000;
    private final String BASIC_SAMPLE_PACKAGE = "com.android.calculator2";

    @Before
    public void setUp() {
        // Initialize UiDevice instance
        mDevice = UiDevice.getInstance(InstrumentationRegistry.getInstrumentation());

        assertThat(mDevice, notNullValue());

        // Start from the home screen
        mDevice.pressHome();

        // Wait for launcher
        final String launcherPackage = mDevice.getLauncherPackageName();
        assertThat(launcherPackage, notNullValue());
        mDevice.wait(Until.hasObject(By.pkg(launcherPackage).depth(0)), LAUNCH_TIMEOUT);

    }

    @Test
    public void calTest() {
        mDevice.findObject(By.desc("应用")).click();
        mDevice.wait(Until.hasObject(By.desc("计算器")), LAUNCH_TIMEOUT);
        mDevice.findObject(By.desc("计算器")).click();

        UiObject2 button7 = mDevice.wait(Until.findObject(By.res("com.android.calculator2", "digit_7")), 500);
        UiObject2 buttonX = mDevice.wait(Until.findObject(By.res("com.android.calculator2", "op_mul")), 500);
        UiObject2 button6 = mDevice.wait(Until.findObject(By.res("com.android.calculator2", "digit_6")), 500);
        UiObject2 buttonEqual = mDevice.wait(Until.findObject(By.res("com.android.calculator2", "eq")), 500);
        UiObject2 output = mDevice.wait(Until.findObject(By.res("com.android.calculator2", "result")), 500);

        button7.click();
        buttonX.click();
        button6.click();
        buttonEqual.click();
        assertEquals(output.getText(), "42");
    }
}
####5.4 执行测试
先解释一下 JUnit 中关于测试的几个概念:
- Test : 即用 “@Test” 标注的测试用例
- TestCase : 用于组织测试用例(TestMethod)的测试类(), 通常包含一到多个TestMethod
- TestSuite : 多个TestCase的集合, 把多个 TetsCase 组合在一起执行的快捷方式, 如果自己没有定义,Junit会自动提供一个test suite ,包括TestCase中的所有测试
在 android studio 中, 直接在对应的 测试类的文件上右键点击, 选择”Run ‘xxx’“即可运行整个测试类, 或者在整个测试类源码的目录上右键点击, 选择”Run ‘xxx’“, 即可运行整个目录下的所有的测试类
在命令行中, 使用 am instrument 命令来执行测试
例如, 执行 com.example.test.CalculatorTest 测试类中的所有测试方法
adb shell am instrument -w -e class com.example.test.CalculatorTest com.exapmle.test.test/android.support.test.runner.AndroidJUnitRunner
例如, 执行 com.example.test.test 包中的所有测试类
adb shell am instrument -w com.exapmle.test.test/android.support.test.runner.AndroidJUnitRunner
AndroidJUnitRunner常用的参数如下:
- -e testFile
: 运行文件中指定的测试, 例如 adb shell am instrument -w -e testFile /sdcard/tmp/testFile.txt com.android.foo/com.android.test.runner.AndroidJUnitRunner- 文件的格式为 com.android.foo.FooClaseName#testMethodName
- -e package
: 运行指定package中的测试, 例如 - 运行指定package中的所有测试:
adb shell am instrument -w -e package com.android.foo.bar com.android.foo/android.support.test.runner.AndroidJUnitRunner
- 运行指定package中的所有测试:
- -e calss
: 运行指定类中的测试方法, 例如 - 运行类中的所有测试:
adb shell am instrument -w -e class com.android.foo.FooTest com.android.foo/android.support.test.runner.AndroidJUnitRunner - 运行类中的指定测使:
adb shell am instrument -w -e class com.android.foo.FooTest#testFoo com.android.foo/android.support.test.runner.AndroidJUnitRunner - 运行多个类中的所有测试:
adb shell am instrument -w -e class com.android.foo.FooTest,com.android.foo.TooTest com.android.foo/android.support.test.runner.AndroidJUnitRunner
- 运行类中的所有测试:
- -e notcalss
: 运行除指定类外的测试, 例如 - 运行包中除指定类外的所有测试:
adb shell am instrument -w -e notClass com.android.foo.FooTest com.android.foo/android.support.test.runner.AndroidJUnitRunner - 运行包中除了指定测试外的所有测试:
adb shell am instrument -w -e notClass com.android.foo.FooTest#testFoo com.android.foo/android.support.test.runner.AndroidJUnitRunner
- 运行包中除指定类外的所有测试:
-
-e size [small medium large]: 运行注解为SmallTest/MediumTest/LargeTest的用例 - 运行执行注解的测试:
adb shell am instrument -w -e annotation com.android.foo.MyAnnotation com.android.foo/android.support.test.runner.AndroidJUnitRunner
- 运行执行注解的测试:
- -e annotation
: 运行指定注解的用例 - -e notAnnotation
: 运行不包含指定注解的用例 - -e listener
: 指定一个或者多个运行监听器观察测试运行,可用于定制测试报告,e.g. -e listener com.foo.Listener,com.foo.Listener2. - -e timeout_msec
:设置超时时间,将被应用到每一个测试,e.g.-e timeout_msec 5000.
####5.5 JUnit 断言和注解
断言
断言是编写测试用例的核心实现方式,即期望值是多少,测试的结果是多少,以此来判断测试是否通过, 在结果与预期值不相符时, 将测试结果判为fail
//查看两个数组是否相等
assertArrayEquals(expecteds, actuals)

//查看两个对象是否相等。类似于字符串比较使用的equals()方法
assertEquals(expected, actual)

//查看两个对象是否不相等
assertNotEquals(first, second)

//查看对象是否为空
assertNull(object)

//查看对象是否不为空
assertNotNull(object)

//查看两个对象的引用是否相等。类似于使用“==”比较两个对象
assertSame(expected, actual)

//查看两个对象的引用是否不相等。类似于使用“!=”比较两个对象
assertNotSame(unexpected, actual)

//查看运行结果是否为true
assertTrue(condition)

//查看运行结果是否为false
assertFalse(condition)

//查看实际值是否满足指定的条件
assertThat(actual, matcher)

//让测试失败
fail()
注解
JUnit4的测试类不用再继承TestCase类了, 而是使用 Java 5 中的注解(annotation), JUnit 4 中常用的注解如下:
- @Before : 初始化方法, 父类的@BeforeClass注解方法会在子类的@BeforeClass注解方法执行前执行
- @After : 释放资源, 父类中的@After注解方法会在子类@After注解方法执行后被执行
- @Test : 测试方法,任何异常的抛出都会认为测试失败, 在这里可以测试期望异常和超时时间, JUnit每次都会创建一个新的测试实例,然后调用@Test注解方法, @Test注解提供2个参数:
- “expected”,定义测试方法应该抛出的异常,如果测试方法没有抛出异常或者抛出了一个不同的异常,测试失败
- “timeout”,如果测试运行时间长于该定义时间,测试失败(单位为毫秒)
- @Ignore : 忽略的测试方法
- @BeforeClass : 针对类中的所有测试,只执行一次,且必须为static void, 父类的@BeforeClass注解方法会在子类的@BeforeClass注解方法执行前执行
- @AfterClass : 针对类中的所有测试,只执行一次,且必须为static void, 父类中的@AfterClass注解方法会在子类@AfterClass注解方法执行后被执行
- @RunWith() : 指定测试类使用某个runner
- @Suite.SuiteClasses() : 定义TestSuite
- @Parameters : 指定测试类的测试数据集合
- @Rule : 允许灵活添加或重新定义测试类中的每个测试方法的行为
- @FixMethodOrder : 指定测试方法的执行顺序, 一个测试类中可以使用多个”@Test”注解来定义多个测试方法, 目前有3种排序方式
- @FixMethodOrder(MethodSorters.JVM) : 按照JVM里面返回的方法名的顺序执行, 此种方式下测试方法的执行顺序是不可预测的,即每次运行的顺序可能都不一样
- @FixMethodOrder(MethodSorters.NAME_ASCENDING) : 按方法名称的进行排序,由于是按字符的字典顺序,所以以这种方式指定执行顺序会始终保持一致
- @FixMethodOrder(MethodSorters.DEFAULT) : (默认的排序方式) 顺序由方法名hashcode值来决定,如果hash值大小一致,则按名字的字典顺序确定 由于hashcode的生成和操作系统相关(以native修饰),所以对于不同操作系统,可能会出现不一样的执行顺序,在某一操作系统上,多次执行的顺序不变
一个测试类中方法的执行顺序为:
父类的@BeforeClass -> @BeforeClass –> {父类的@Before -> @Before –> @Test –> @After -> 父类的@After} -> ...... -> {......} -> @AfterClass -> 父类的@AfterClass
定义TestSuite
JUnit4 中, 若需要将多个 TestCase 组织 TestSuite, 则需要使用2个注解
- @RunWith(Suite.class) : 指定使用Suite运行器来运行测试
- @Suite.SuiteClasses({}) : 指定运行哪些测试类。测试类可以指定为Suite,这样JUnit会继续再去寻找里面的测试类,一直找到能够执行的Test Case并执行之
例如, 有 TestCase1 ~ TestCase5 共五个 TestCase, 现在需要定义一个TestSuite, 依次执行 TestCase3, TestCase1, TestCase5 这几个TestCase, 则可以定义一个TestSuite
//file TestSuite1.java
package com.example.test;

import org.junit.runner.RunWith;
import org.junit.runners.Suite;

@RunWith(Suite.class)
@Suite.SuiteClasses({TestCase3.class, TestCase1.class, TestCase5})

public class TestSuite1 {
}
####5.6 Instrumentation 中的注解
基于 Instrumentation 的 测试可以使用 @SmallTest、@MediumTest、@LargeTest 表示该测试的依赖程度
- @SmallTest : 测试代码中不与任何的文件系统或网络交互, time limit 为60s
- @MediumTest : 测试代码会访问如下的资源, time limit 为300s
- localhost network
- database
- file system
- Multiple threads
- Sleep statements
- System properties
- @LargeTest : 测试代码中访问外部的文件系统或网络
- network
- database
- file system
- external file systems
- Multiple threads
- Sleep statements
- System properties
在运行测试时, 可以指定只执行不同类型的test
adb shell am instrument -e size small/medium/large -w <test_package_name>/<test_runner_class>